4G LTE
Turn off the unit then replace SIM card. Corresponding firmware will be loaded automatically after Skylight is running, please do not shut down or reboot the unit during firmware update process.
Please contact our support team for details.
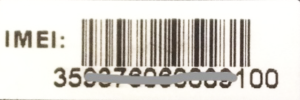
The International Mobile Equipment Identity (IMEI) is a unique numerical identifier for every mobile device. This number helps to differentiate each device from one another. A standard IMEI number is a 14 digit string, with an additional 15th check digit for verifying the entire string.
- IMEI label is located on the bottom of unit.

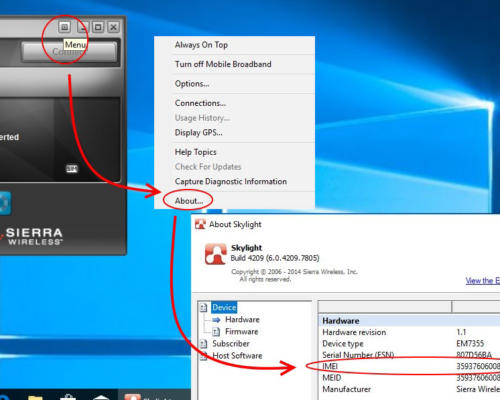
- In WWAN connection manager software (Sierra Wireless Skylight), click “MENU” then click “About.” IMEI number can be found under “Hareware.”

AUDIO
There is a hardware volume control located on your computer, please refer to your user manual for more details.
User’s manuals are available in electronic format on the desktop. They are saved in PDF format and named “User’s Guide.”
BATTERY
Please perform Battery Auto Learning. The battery auto learning can be located in the BIOS. To enter the BIOS, push and hold the DEL key as soon as your switch on your computer, then go to the ADVANCED option and select Battery Auto learning and hit Enter and follow the on-screen instruction.
No, they charge independently so you would need to take the media bay battery off if you want to charge the unit and the media bay battery at the same time.
When the unit is with 2nd battery,
- System will charge the main battery as priority and then the Ext. 2nd battery.
- System will discharge the Ext. 2nd battery as priority.
The R8300 has dual bay battery charger for main battery and media bay battery.
Please issue RMA request via https://www.durabook.com/us/support/rma/ to have it serviced at the authorized service center.
The bridge battery can be charged by power source (AC Adapter or main battery).
The U11 and S14 provide the options of 2-bay and 8-bay battery chargers supporting infinite power performance.
BIOS
PXE boot in UEFI available on selected models, to enable PXE boot please change BIOS settings as following.
- set “Launch Network PXE OpRom” to “UEFI”
- set “Boot Option #1 to “Network”.
BLUETOOTH
Please uninstall Bluetooth driver then download and install latest version from Support / Downloads section or click here to download it.
BOOT ERROR
Solution:
The D14E is designed with Raid capability and setup. You will need to make changes in the bios in order for it to boot up correctly.
Steps:
1. Press “del” during boot-up. In the bios screen, proceed to Advanced tab by using the directional arrow keys on keyboard.
2. Select Configure Sata and choose Raid and hit enter.
3. Then proceed to save changes and exit. During boot-up, there will be a Raid setup prompt to go into the wizard.
4. Optional: If you have not configured it, you will need to press Crtl + i to get into the setup wizard.
5. If you have already configured it, then it should boot normally into your operating system provided that it was previously installed from our factory.
Including: D14E
DOCKING STATION
Solution:
1. Plug in the power cord to docking station.
2. You unit’s battery must still have power remaining in the battery. If not, please charge 3 to 5 minutes before proceeding to step 3.
3. Power unit on and then Press the FN + enter key, which is the center button of the joystick or pad.
4. You will hear a momentary click indicating to undock unit from docking station. The click will last about 3 to 5 seconds. If you miss it, you will need to repeat step 3 again.
GENERAL QUESTION
R8300 R2 Skylake – optional media bay battery can be used as 2nd battery pack. While the unit is functioning you can switch out the main battery or media bay battery with a fresh one to give continued use of the unit. The R8300 also provides dual bay battery charger for main battery and media bay battery.
When the unit is with 2nd battery,
- System will charge the main battery as priority and then the Ext. 2nd battery.
- System will discharge the Ext. 2nd battery as priority.
R8300 R3 Kaby Lake – optional media bay battery can be used as 2nd battery pack. While the unit is functioning you can switch out the main battery or media bay battery with a fresh one to give continued use of the unit. The R8300 also provides dual bay battery charger for main battery and media bay battery.
When the unit is with 2nd battery,
- System will charge the main battery as priority and then the Ext. 2nd battery.
- System will discharge the Ext. 2nd battery as priority.
U11 – The optional bridge battery support 5 mins hot swap time. While the unit is functioning you can switch out the main battery with a fresh one to give continued use of the unit. The U11 also provides 2-bay and 8-bay battery chargers supporting infinite power performance.
S14 – The optional bridge battery support 5 mins hot swap time. While the unit is functioning you can switch out the main battery with a fresh one to give continued use of the unit. The S14 also provides 2-bay and 8-bay battery chargers supporting infinite power performance.
In the US and Canada, Durabook products are distributed through Synnex or ASI. Durabook Americas recommends companies only work with authorized Durabook resellers to acquire Durabook products, parts or service. Please contact us to access the authorized reseller list.
To purchase, fill out the contact form online at https://www.durabook.com/
A Durabook sales representative will contact you to help you determine the perfect solution for your needs and assist you with finding a reseller in your region or who supports any buying contracts you may need to purchase under.
Please visit Contact Us page at: https://www.durabook.com/
Several of our online resellers can assist you such as: www.cdw.com. Or you can purchase accessories directly from Durabook Americas. To purchase from Durabook Americas send an email to [email protected] or call 1-800-552-8946.
Durabook keeps spare or equal parts for 7 years after product end of life (Durabook laptop’s/tablet’s main battery, charger, spare drives)
To purchase from Durabook Americas send an email to [email protected] or call 1-800-552-8946.
Please visit our website for warranty information.
You can have this option when purchase unit. Limited models: R8300, SA14, S15AB and R11.
System serial number can be found on one of two locations:
- The serial number can be found on the side of the original Durabook box, starting with SY and following with 10 digit numbers.
- You can locate your serial number printed on a small sticker on the bottom of your computer.

DVD / CD DRIVE
Please go to the Start manual then click on all programs, and double click on the CyberLink Power2GO application. Next follow the on screen instruction or refer to www.cyberlink.com for more details.
Go to the Start menu then click on all programs, and double click on the Cyberlink PowerDVD application. You can click play when the Cyberlink meida player appears.
Please go to the Start manual then click on all programs, and double click on the Cyberlink PowerDVD application. You can click play when the control panel appears.
My optical drive is making a loud noise after I inserted a CD disc into the drive. What should I do?
Normally the noise is caused by a bad quality CD disc, the disc itself should still be working, but it might not be completely flat so it will cause the disc to spin abnormally in the optical drive.
GPS
1. Download the GpsGate application at: GPSGATE
2. Run the GpsGate.exe installer
3. When you see GPSGATE setup wizard screen, click “Advanced setup”
4. On the Input tab, choose COM Port, click on Settings, and choose COM2, 9600, OK. Then click Open.
5. At this point, you should see “Running OK! GPS data but no position” This is because GPS doesn’t detect any signal yet. You have to move to an open area.
6. On the Output tab, choose Virtual COM port, click Add. Pick the first virtual port available, then click OK.
7. Open Microsoft Streets & Trips, try to detect GPS again.
FAQ-KL080910
Including : R13S
KEYBOARD
Please make sure the number lock is disabled. To disable the number lock function, hold the Fn key and then press the NumLock key at the same time. Or just press only the Num Lock key on the keyboard to deactive it.
LCD
Click on Windows (Start) button, and open “Penmount 6000 USB Driver” folder, then open “Utility” folder. Finally choose “PenMount Control Panel” to open utility screen. Under “Device” tab, click on “Configure” button. You should be able to calibrate your screen at this moment.
Including : D14E
Click on Windows (Start) button, and open “Penmount 6000 USB Driver” folder, then open “Utility” folder. Finally choose “PenMount Control Panel” to open utility screen. Under “Device” tab, click on “Configure” button. You should be able to calibrate your screen at this moment. (KL080910)
Including : D14RM (U14M)
Solution:
Intermitten vertical line(s) can be signs of loose lcd cable due to over period of usage or simply defective lcd harness/cable or even defective LCD display. Please email: [email protected] or proceed here https://www.durabook.com/us/support/rma/ to obtain a RMA#. Your unit will need to be ship back to our service center for our repair technicians to diagnose the problem. If unit is in warranty then it will be covered under standard warranty policy. If unit is out of warranty then applicable charges and fees will apply.
MANUAL
All our products have switched to electronic version of user’s manual which is saved on the desktop in PDF format named User’s Guide (in some cases).
POWER
Take off the battery from the computer and plug-in the AC adapter, and try to turn on the computer again. If your system still unstable to switch on, please contact Durabook Tech support at 800-552-8946.
SOFTWARE MEDIA
Setup thru Durabook QuickMenu, Auto Rotate, on/off
U11 touch function works on “Finger mode” by default, to switch to Stylus mode please change the touch mode from “Finger/Water” to “Stylus” in QuickMenu.
SYSTEM RECOVERY
Phoenix Recovery:
The Firstware recovery function is located on a special partition which invisible from windows platform. To access it, first shutdown the laptop; then press the power button and the F4 key at the same time to activate PHOENIX RECOVERY function. This should restore all the settings back to original condition when it was shipped out. IMPORTANT: PLEASE BACK UP ALL YOUR FILES BEFORE RECOVERY AS IT WILL WIPE OUT ALL FILES THAT YOU CREATED SINCE YOU RECEIVED THE LAPTOP.
Wasay Recovery:
The model D13RY came with pre-loaded recovery system which will allow you to restore the entire Windows OS back to the manufacturer condition with just the push of two buttons.
First of all, you will notice a command line saying press Alt+F4 to restore your system when you first start the computer. So all you need to do is press Alt+F4 when you see that screen, and the Wasay recovery application will walk you through the process of restoring your OS back to the original conidition.
Including : D13RY (S13Y)
The Firstware recovery function is located on a special partition which invisible from windows platform. To access it, first shutdown the laptop; then press the power button and the F4 key at the same time to activate PHOENIX RECOVERY function. This should restore all the settings back to original condition when it was shipped out. IMPORTANT: PLEASE BACK UP ALL YOUR FILES BEFORE RECOVERY AS IT WILL WIPE OUT ALL FILES THAT YOU CREATED SINCE YOU RECEIVED THE LAPTOP.
Phoenix Recovery:
The Firstware recovery function is located on a special partition which invisible from windows platform. To access it, first shutdown the laptop; then press the power button and the F4 key at the same time to activate PHOENIX RECOVERY function. This should restore all the settings back to original condition when it was shipped out. IMPORTANT: PLEASE BACK UP ALL YOUR FILES BEFORE RECOVERY AS IT WILL WIPE OUT ALL FILES THAT YOU CREATED SINCE YOU RECEIVED THE LAPTOP.
Wasay Recovery:
The model D14RY came with pre-loaded recovery system which will allow you to restore the entire Windows OS back to the manufacturer condition with just the push of two buttons.
First of all, you will notice a command line saying press Alt+F4 to restore your system when you first start the computer. So all you need to do is press Alt+F4 when you see that screen, and the Wasay recovery application will walk you through the process of restoring your OS with the original configurations and settings.
Including : D14RY (S14Y)
Phoenix Recovery:
The Firstware recovery function is located on a special partition which invisible from windows platform. To access it, first shutdown the laptop; then press the power button and the F4 key at the same time to activate PHOENIX RECOVERY function. This should restore all the settings back to original condition when it was shipped out. IMPORTANT: PLEASE BACK UP ALL YOUR FILES BEFORE RECOVERY AS IT WILL WIPE OUT ALL FILES THAT YOU CREATED SINCE YOU RECEIVED THE LAPTOP.
Wasay Recovery:
The model D15TS came with pre-loaded recovery system which will allow you to restore the entire Windows OS back to the manufacturer condition with just the push of two buttons.
First of all, you will notice a command line saying press Alt+F4 to restore your system when you first start the computer. So all you need to do is press Alt+F4 when you see that screen, and the Wasay recovery application will walk you through the process of restoring your OS with the original configurations and settings.
Including : D15RP (S15S)
Phoenix Recovery:
The Firstware recovery function is located on a special partition which invisible from windows platform. To access it, first shutdown the laptop; then press the power button and the F4 key at the same time to activate PHOENIX RECOVERY function. This should restore all the settings back to original condition when it was shipped out. IMPORTANT: PLEASE BACK UP ALL YOUR FILES BEFORE RECOVERY AS IT WILL WIPE OUT ALL FILES THAT YOU CREATED SINCE YOU RECEIVED THE LAPTOP.
Wasay Recovery:
The model D15TS came with pre-loaded recovery system which will allow you to restore the entire Windows OS back to the manufacturer condition with just the push of two buttons.
First of all, you will notice a command line saying press Alt+F4 to restore your system when you first start the computer. So all you need to do is press Alt+F4 when you see that screen, and the Wasay recovery application will walk you through the process of restoring your OS with the original configurations and settings.
Including : D15TS (S15S)
USB
First make sure all USB devices are connected to the system, and then restart the computer and push the “DEL” key at the post screen. Enter BIOS and move the tap to the Exit option and select “LOAD OPTIMAL DEFAULT” then hit enter, save the changes and exit. This action should fix most USB devices related issue.
Including : D13RY (S13Y), D14RY (S14Y), D15RP (S15S), D15TS (S15S), N15RB (R15B), N15RI (R15D)
WARRANTY
Please refer to your reseller for more details on the warranty information.
Please fill out the RMA Request form listed in the link below.
Please fill out the RMA Request form listed in the link below.
WINDOWS OPERATING SYSTEM
Please download the latest version of Movie Maker from Microsoft.com in the link listed below:
Including : D13RY (S13Y)
1. Go to BIOS menu by tapping on “Del” key when you see the Intel logo.
2. Go to Advance menu, and make sure Configure SATA as is set to “IDE” instead of “AHCI.
3. Go to Exit menu, choose “Save & Exit”.
WINDOWS OS UPGRADE / DOWNGRADE
Yes. There are two ways to do this:
1. You can purchase optional Windows 7 Pro Recovery Disc Set (including Drivers DVD). Please call us to get information on how to purchase online. (Note: There will be no ALT+F4 recovery function if you go by this option.)
2. You can contact us to setup RMA service for this upgrade. We will reload operating system to include ALT+F4 recovery function. There will be a charge for labor and shipping fee. Note: The above is applicable to any Durabook model with Windows 7 Pro COA sticker.
WIRELESS
Please make sure the wireless switch is turn on. In most cases the wireless switch can be located next to the ON/OFF button, and next configure the wireless router to work with the Durabook computer. For additional information on how to configure the router, please refer to the router’s user manual.
still not sure?
If you are not able to find the solution to your issue, please let us help. Click here to get in contact with our team of technical support specialists.

